Integration M.E.Doc
Integration ensures the exchange of primary documents between the M.E.Doc program and Business Central. There is no longer a need to manually export files from one system and upload them to another — documents are transferred automatically via API.
Integration requirements
- The server (network) version of the M.E.Doc program has been installed. After this, the M.E.Doc REST API functionality will be available.
- A license for Integration with accounting systems has been purchased from the M.E.Doc provider.
Note
The M.E.Doc REST API functionality uses an insecure connection. To configure a secure connection between BC and the M.E.Doc provider, please contact your SMART consultant for further instructions.
Settings
- Click on the
 button, which opens the Search function, enter eReporting Setup and select the appropriate link.
 - On the settings list page, click the Create button to create a new setting.
On the General tab, you need to fill in the following fields:
| Fields | Description |
|---|---|
| Code | Specifies the code of the eReporting service for the exchange of electronic documents. |
| Description | Specifies the description of the eReporting service for the exchange of electronic documents. |
| Provider | Specifies the provider of the eReporting service for the exchange of electronic documents. |
| Service URL | Specifies the URL of the provider from where information is sent and received between systems. |
| Organization ID | Specifies the ID of the company in the provider system. The organization code will be automatically retrieved when you click Actions > Retrieve Organization ID. |
- Fill in the eReporting Document Status in the eReporting Setup by clicking on Actions > Suggest Statuses.
- Fill in the eReporting Users in the eReporting Setup by clicking Related > Users.
- In the Tax Setup, select the created M.E.Doc provider in the eReporting Service field.
Note On the eReporting Setup page, button Get Document Template has been added, which downloads a document template from M.E.Doc by its code. The button is added for the convenience of consultants and developers; when clicked, a file with field names and their descriptions will be generated.
Active Directory OAuth Settings
- Application Registration in Apps Registration.
To register an application, follow these steps:
1.1 Sign in to the Microsoft Entra ID Admin Center with at least Cloud Application Administrator permissions.
1.2 If you have access to multiple environments, use the Settings button in the top menu to switch to the tenant for which you want to register the application from the Directories+Subscriptions menu.
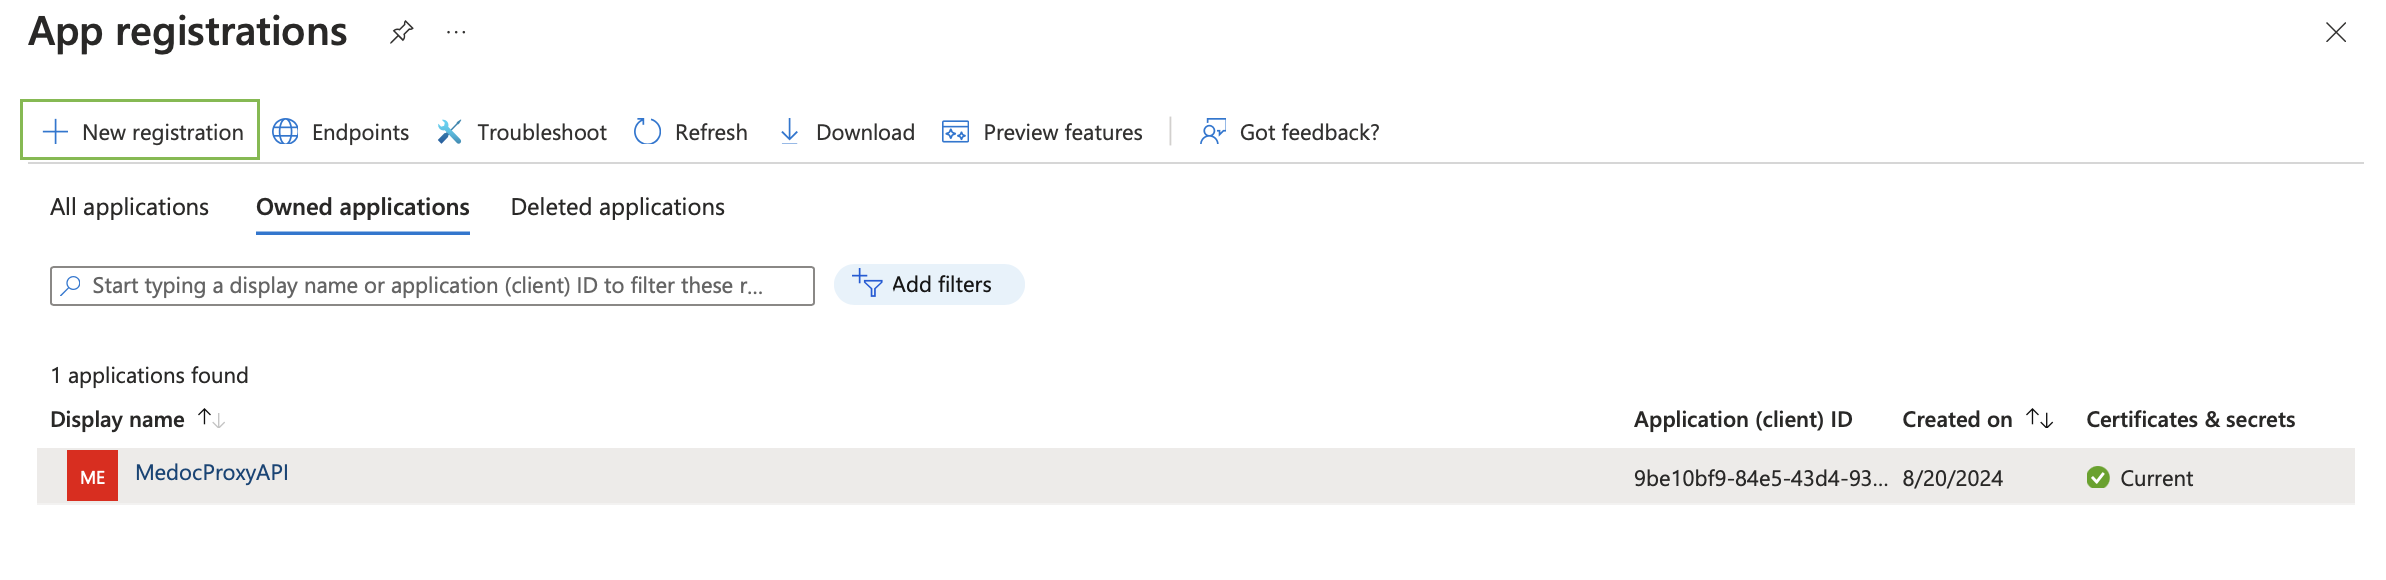
1.3 From the menu, select Identity > Applications > App registrations and select New registration:
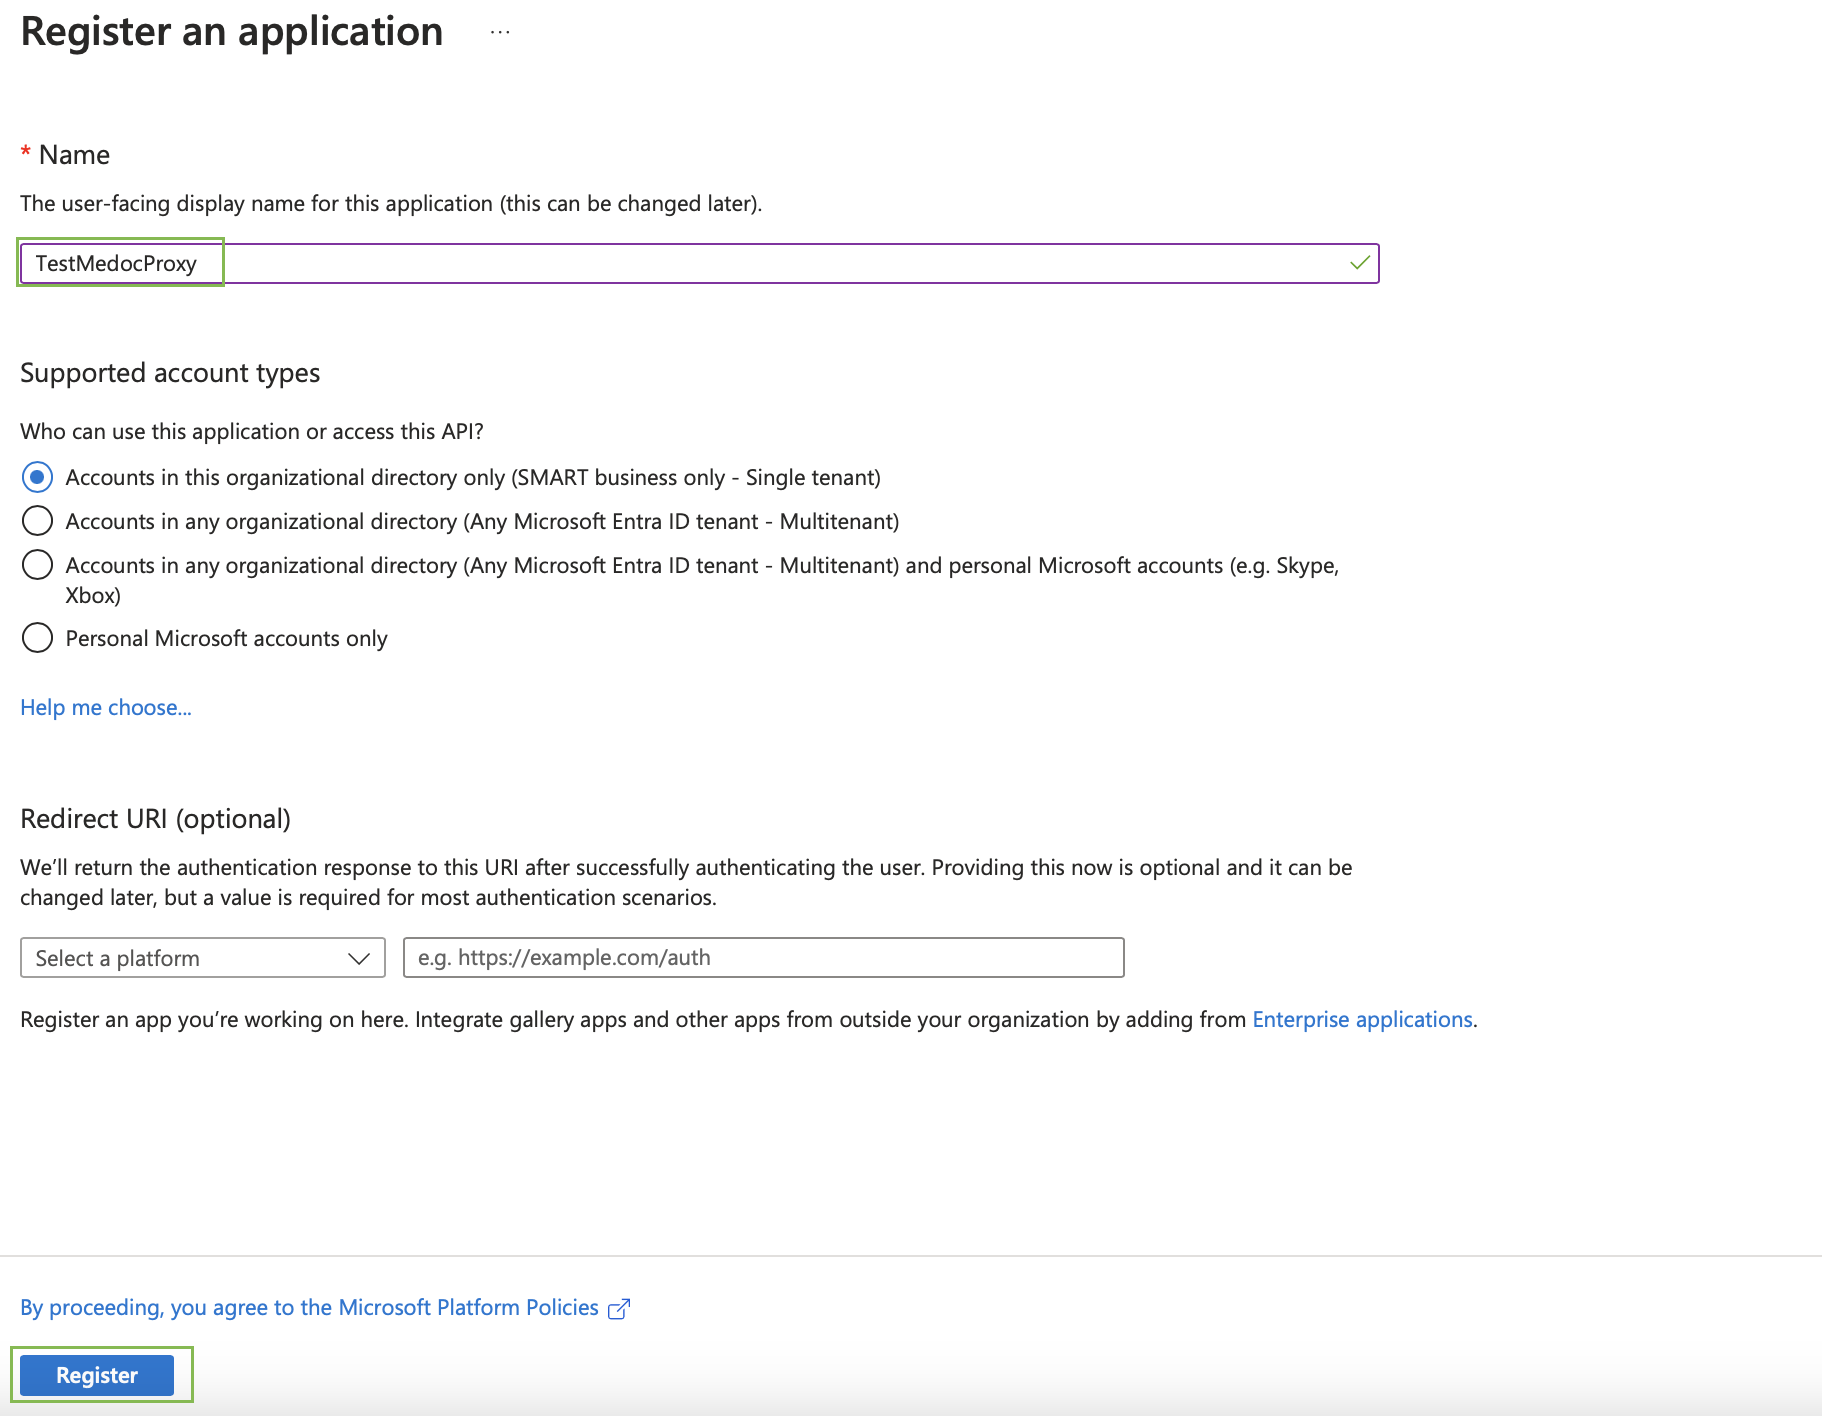
 1.4 Enter the application name and click Register:
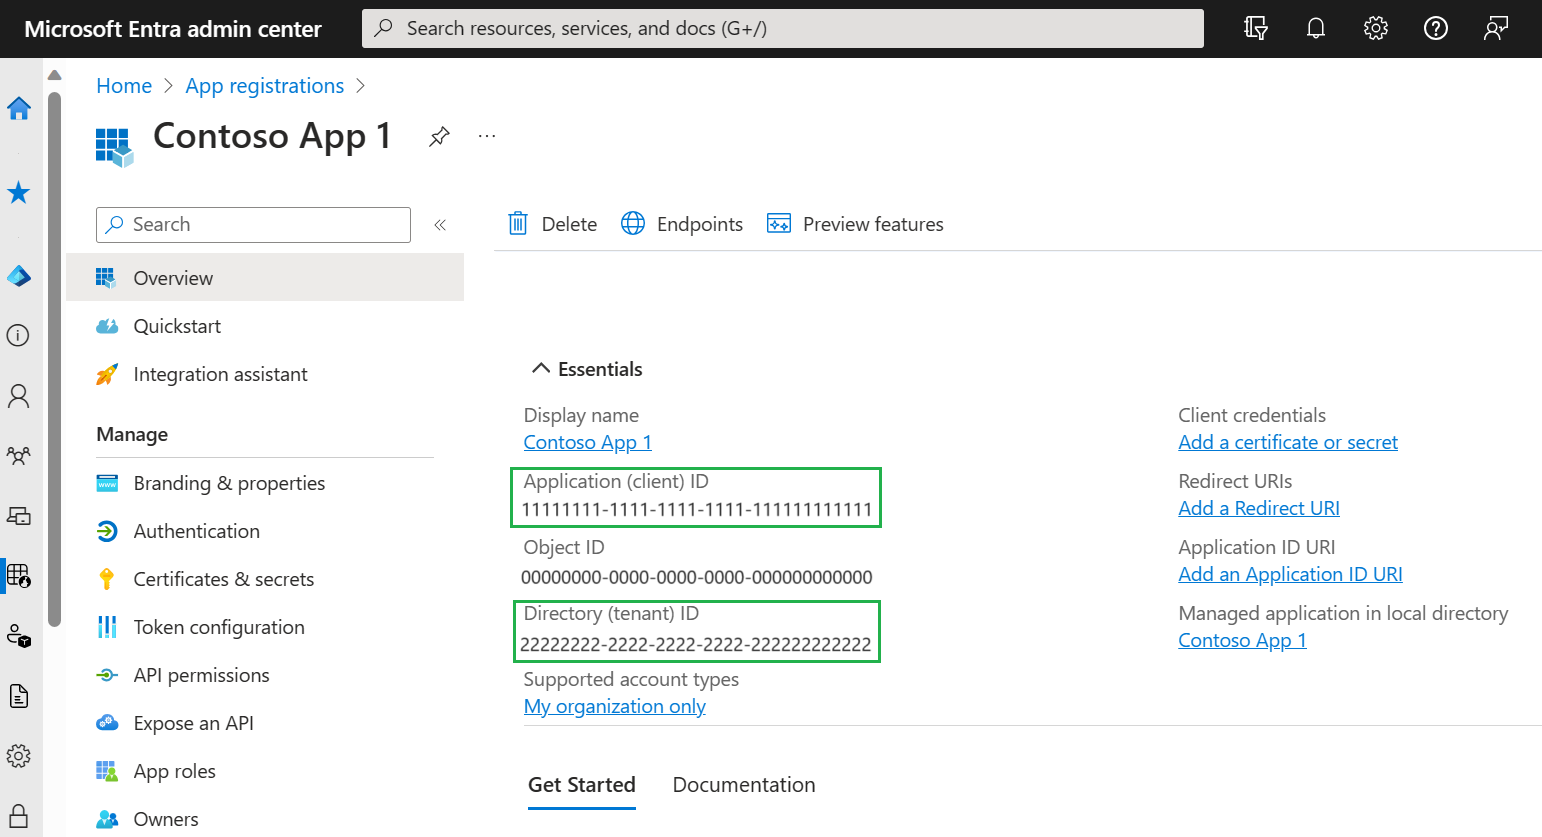
 1.5 After completing the registration, Microsoft Entra will display the application registration overview page. You will see the values for (client) ID and Directory (tenant) ID. This value, also known as the client ID, identifies your application on the Microsoft authentication platform:
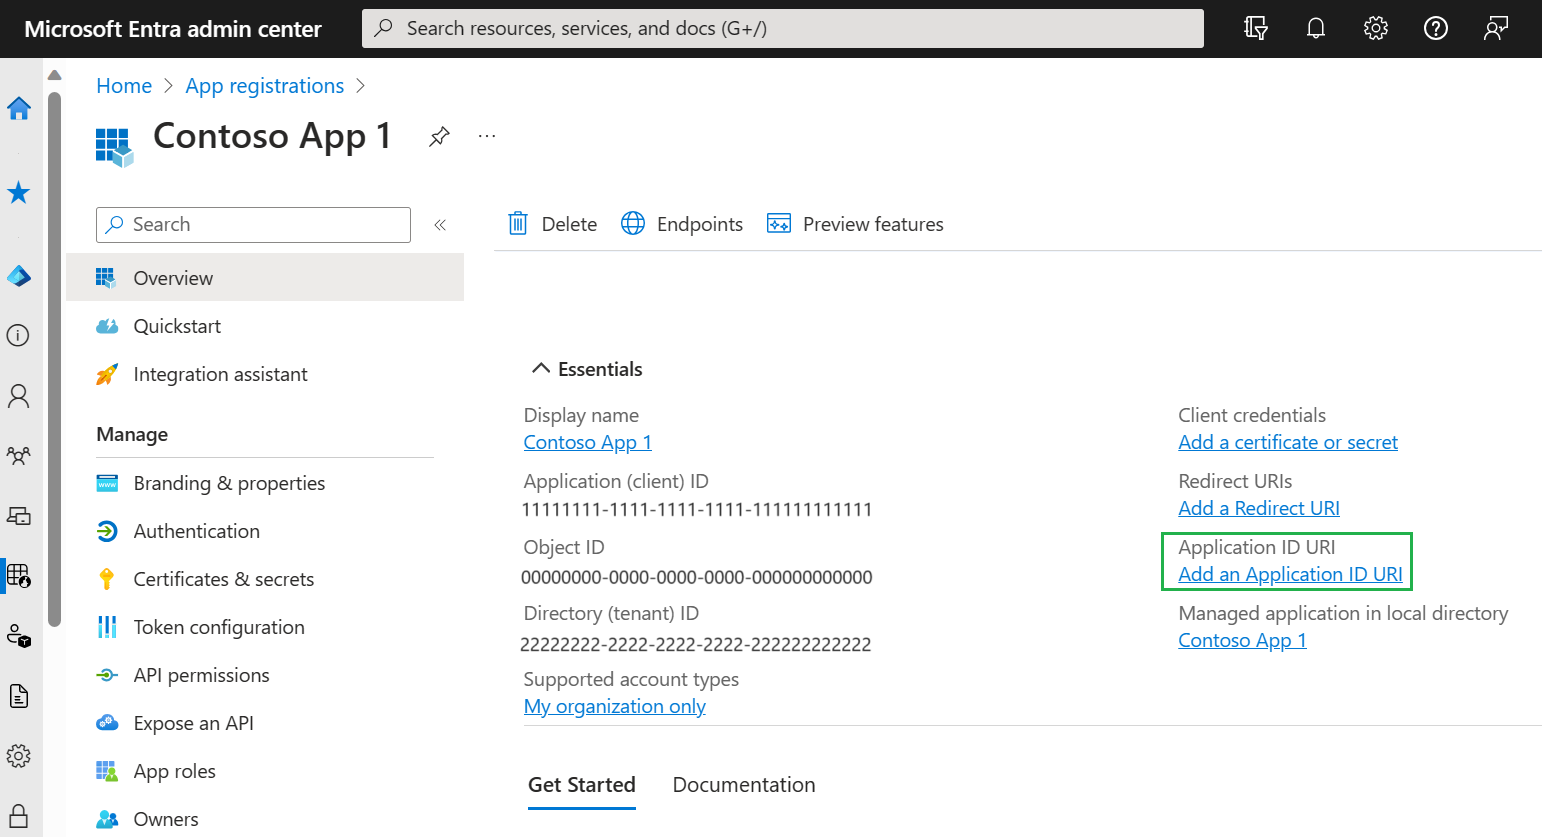
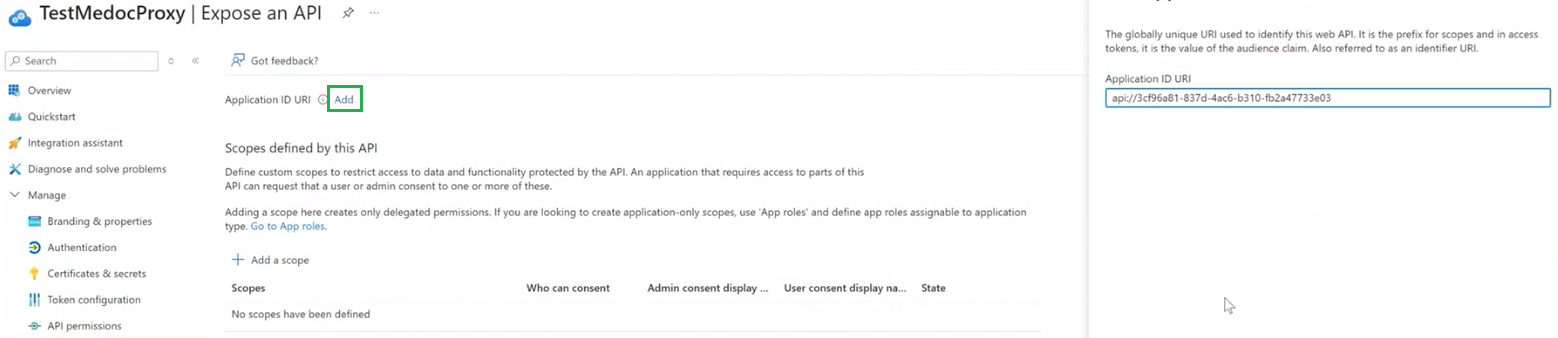
 1.6 Create a redirect URI by clicking Add an Application ID URL:
 Then, in the window that opens, click Add, an ID URL will be generated on the right. Then click Save:
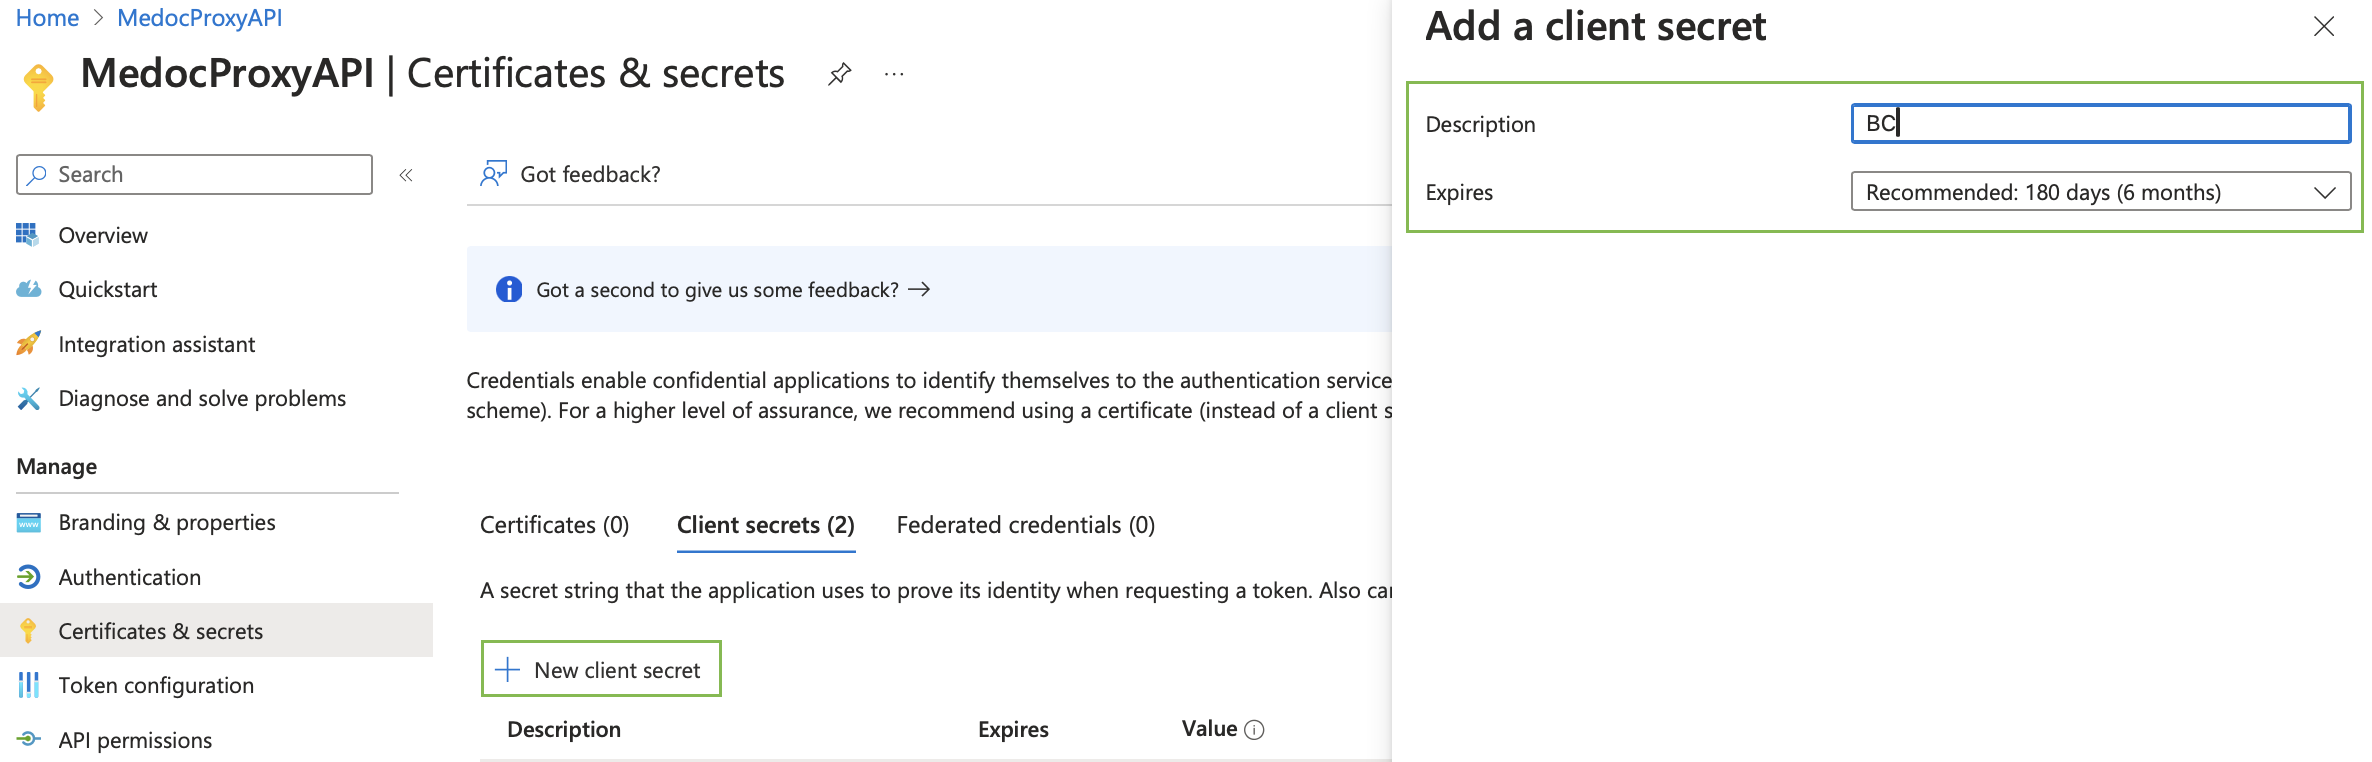
1.7 Add the authentication details. Select Certificates & secrets > New client secret from the menu. On the right, complete the fields «Description» and «Expires» , then click Add:
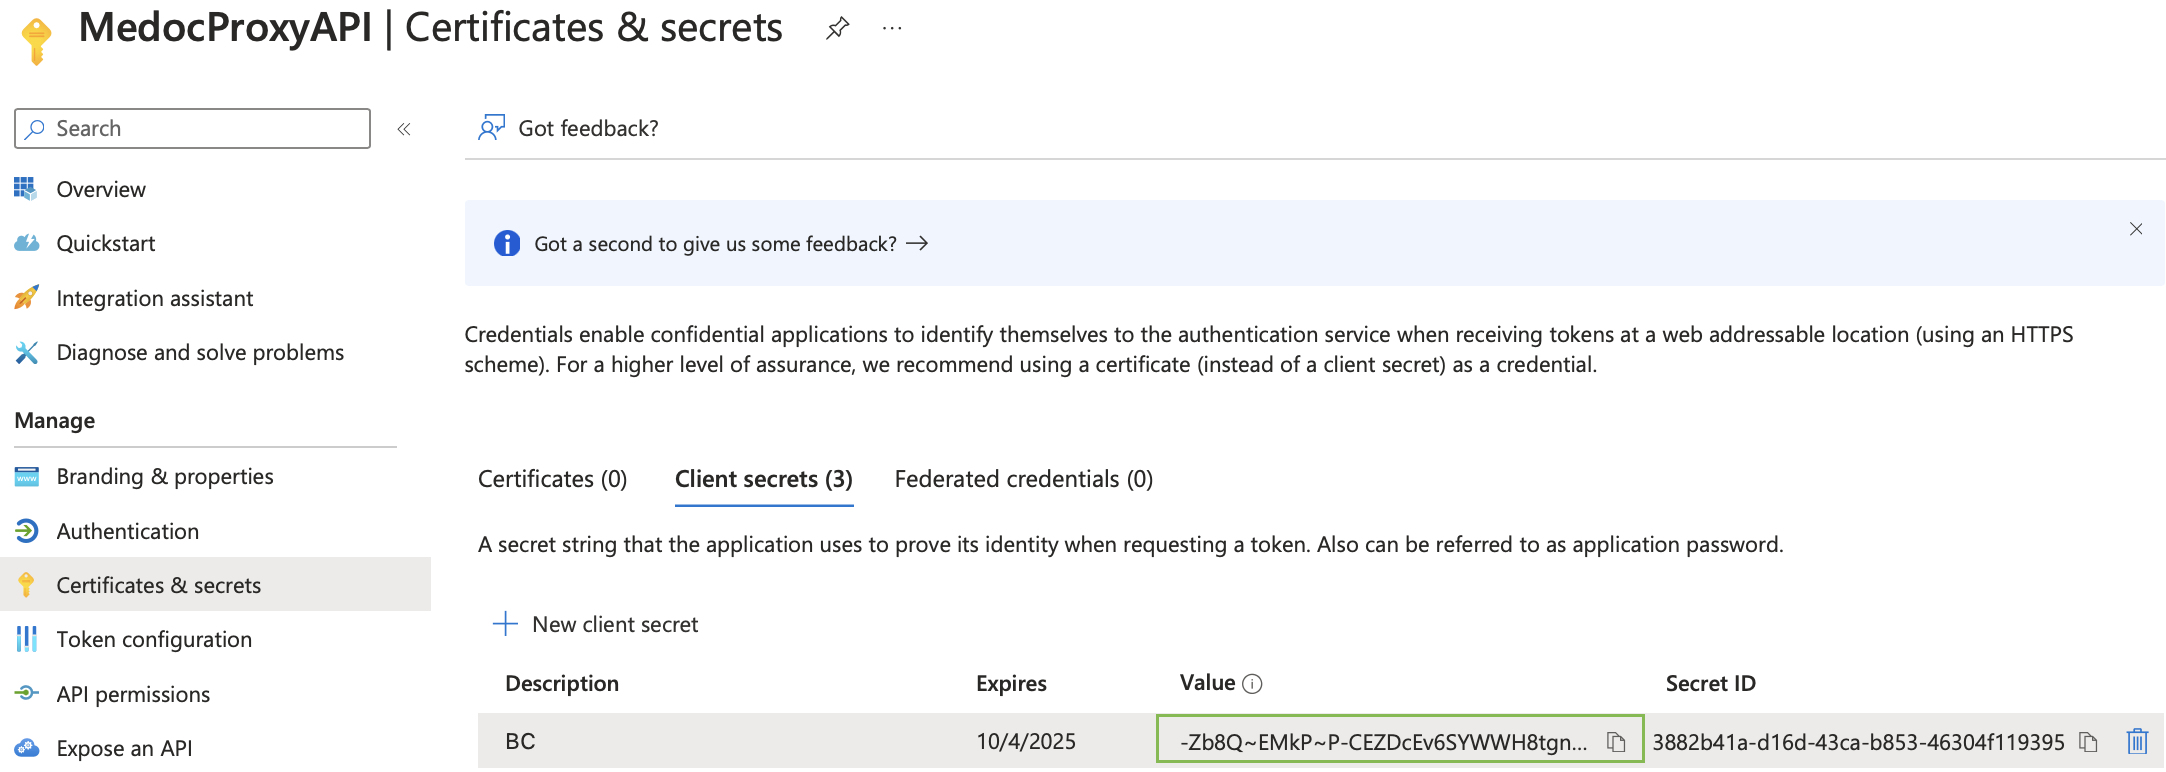
 A Client secret will be generated, which must be copied:
- Enter the generated data in Business Central in eReporting Setup:
 In the «Audience» field, add /.default to the Application ID URL.
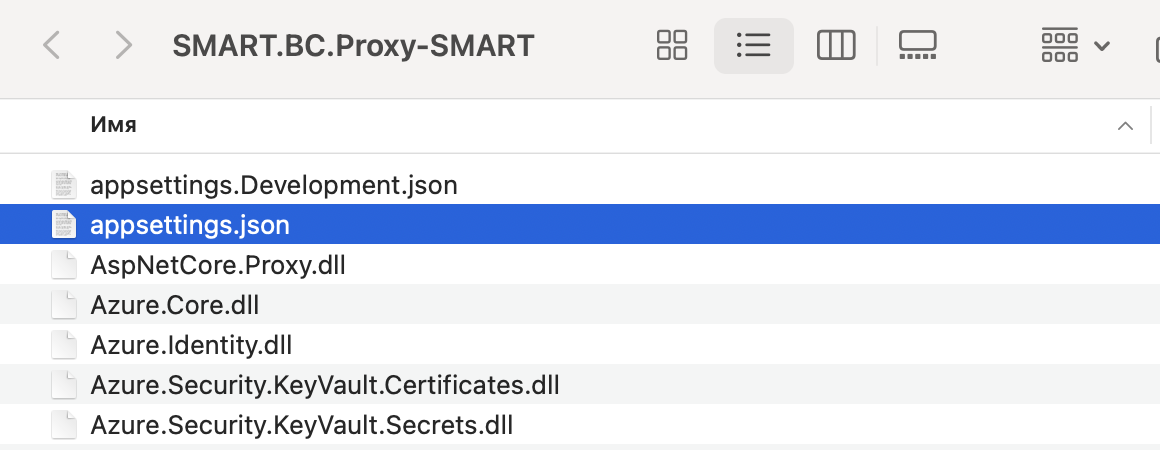
 - Proceed to publish the proxy application on the OnPremise server using IIS. To accomplish this, upload the folder provided by the SMART team to the server that has access to M.E.Doc and place it in inetpub on the IIS server.
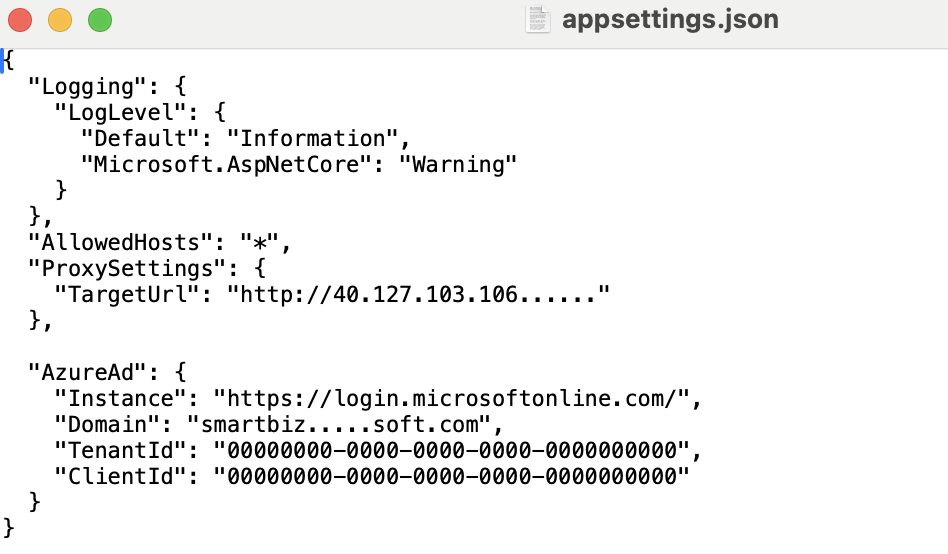
After that, identify the file «appsetings.json» inside the folder:
 Then complete it with the following fields using your data:
- TargetURL – is the link to the API M.E.Doc;
- Instance;
- Domain;
- TenantID;
- ClientID;
- Launch Internet Information Servises (IIS) Manager, create a IIS application, and publish it on the designated port that will be accessible from the cloud-based Business Central, selecting the created folder as the physical path to the application.
- Be advised that ASP.NET Core Module v2 must be installed. https://learn.microsoft.com/en-us/aspnet/core/host-and-deploy/iis/hosting-bundle
- Create an external link to the created IIS application and specify it in the eReporting Setup.
- Recommended to add an SSL certificate to the created IIS application.
Import of Purchased VAT Invoices
To import Purchase VAT Invoices from M.E.Doc, follow these steps:
- Click on the button, which opens the Search function, enter Purchase VAT Invoice List and select the appropriate link.
- On the Purchase VAT Invoice List page, click eReporting service > Import from eReporting service.
- On the Import Purchase VAT Invoices from eReporting report, fill in the upload parameters:
| Fields | Description |
|---|---|
| From Date | Specifies the start date of the period for which documents are loaded from eReporting. |
| To Date | Specifies the end date of the period for which documents are loaded from eReporting. |
| Only Registered | Specifies whether only registered VAT Invoices will be loaded. If the indicator is not enabled, the system will import all VAT Invoices. |
Note Import of Purchase VAT Invoices from eReporting works similarly to the standard localization of the Import Purchase VAT Invoices report. During the import, "eReporting Status" is populated from M.E.Doc. For the import to work, Vendors must be created in the system with the VAT Registration No field filled in.
Export Sales VAT Invoice from the Sales VAT Invoice List
To export Sales VAT Invoices from the Sales VAT Invoice list, follow these steps:
- Click on the button, which opens the Search function, enter Sales VAT Invoice List and select the appropriate link.
- On the Sales VAT Invoice List select the necessary sales VAT invoices with the Released status, click eReporting service and enable the following functions:
- Upload Selected - the VAT invoices will be uploaded to M.E.Doc.
- To download VAT invoices through Job Queue Entries, use the function Set Status to upload - the system will set the selected VAT Invoices eReporing Status - Ready for upload.
Note The Delete from service button in Business Central removes mistakenly uploaded sales VAT invoices from M.E.Doc. Note that only those invoices permitted by the M.E.Doc system for deletion can be removed.
Export of Sales VAT Invoices via XML
To export Sales Invoices using XML Export, follow these steps:
- Click on the button, which opens the Search function, enter Export VAT Invoice (xml) and select the appropriate link.
- Fill in the required parameters and enable the Upload to eReporting service field.
Additional Integration Features
On the eReporting Setup page, the following functions are available:
-Update Document Statuses - updates the statuses of VAT invoices from M.E.Doc.
Note The system will receive statuses from M.E.Doc, but they may not be complete. We recommend that when registering VAT invoices, you should focus on the statuses in M.E.Doc, for example, such as "Sent" or "Message received".
-Update Registration Statuses - updates the "Registration" indicator and registration date (similar to the "Check Registration VAT Invoice" function). -Upload Scheduled Documents - uploads released sales VAT invoices to M.E.Doc with the "Ready for Upload" status.
Note Similar functions have been created and configured in the Job Queue Entries to schedule their periodic execution.